Ditch the Subscription: How Google Maps Can Be Your Free Hunting Buddy
By Derrick Stallings – Huntingofficer.com
Let’s face it, hunting can be an expensive passion. From licenses and tags to gear, weapons, and gas, the costs can quickly add up. And for many of us, the monthly or annual subscription fees for popular hunting apps like OnX Hunt or HuntStand are just another dent in our wallets. Don’t get me wrong, these apps are fantastic, offering incredible features for public and private land mapping, satellite imagery, and much more. But what if I told you that you might already have a surprisingly robust hunting companion hiding in plain sight, absolutely free?
That’s right, I’m talking about Google Maps. While it might not have all the bells and whistles of a dedicated hunting app, Google Maps offers a powerful suite of tools that, with a little know-how, can be an incredibly effective and completely free alternative for many of your hunting needs. So, let’s dive in and learn how to unlock the hidden potential of Google Maps for your next adventure.
The Cost Factor: A Quick Look
First, let’s quickly address the elephant in the room: cost. OnX Hunt, for example, typically runs around $29.99 for a Premium membership (one state) and $99.99 for an Elite membership (all 50 states) annually. HuntStand’s Pro membership is similar, often around $29.99 per year for a single state. Over a few years, those costs really start to accumulate!
Imagine saving anywhere from $30 to $100 per year just by leveraging a tool you already have on your phone. That’s money that can go towards new gear, a tank of gas to get to your hunting spot, or even a new broadhead!
Google Maps: More Than Just Directions
You probably use Google Maps every day to navigate traffic or find the nearest coffee shop. But its capabilities extend far beyond simple turn-by-turn directions. For hunters, its detailed satellite imagery, terrain views, and custom mapping features can be a game-changer.
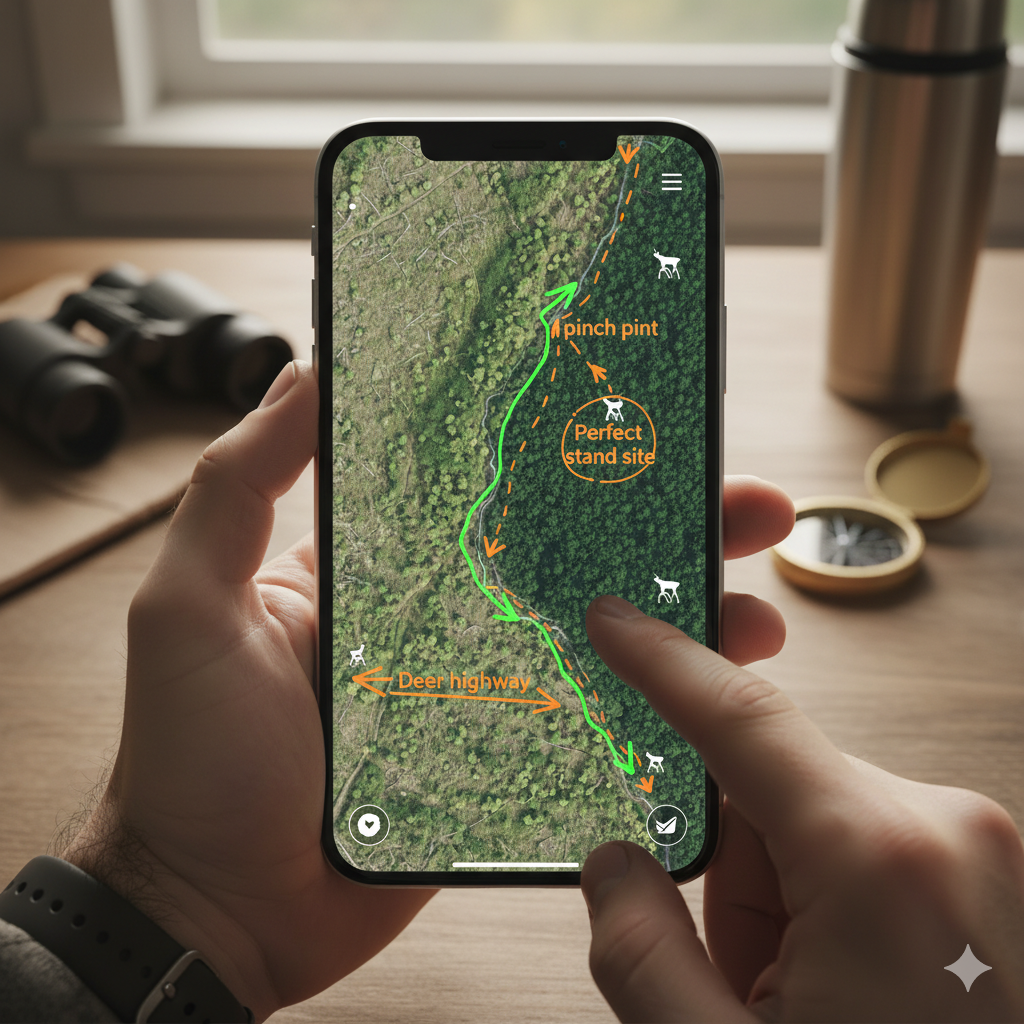
1. Scouting from Your Couch: Satellite Imagery
This is where Google Maps truly shines as a hunting tool. Before you even set foot in the woods, you can use the satellite view to get an invaluable lay of the land.
- Identify Potential Hotspots: Look for changes in vegetation, clearings, water sources, and pinch points. Deer, for instance, often travel along edges where different types of cover meet. A mature hardwood ridge bordering a dense clear-cut? That’s a highway for deer!
- Locate Funnels and Choke Points: Look for narrow strips of timber between open fields, creek beds, or natural saddles in ridges. These natural funnels concentrate animal movement, making them prime locations for setting up stands or planning your approach.
- Pinpoint Bedding and Feeding Areas: Look for dense, thick cover that might serve as bedding areas, often near food sources like agricultural fields, oak stands, or clear-cuts with young growth.
- Plan Your Approach and Exit Routes: Identify the quietest way to get to your stand without disturbing animals. Look for natural barriers or terrain features that can help mask your approach.
How to do it: Simply open Google Maps, search for your general hunting area, and then tap the “Layers” icon (usually a square overlapping another square) in the top right corner. Select “Satellite.” You can then pinch to zoom in for incredible detail.
2. Marking Key Locations: Your Personal Waypoints
Just like dedicated hunting apps, Google Maps allows you to drop pins (waypoints) to mark important locations. This is crucial for scouting and during your hunt.
- Scouting Pins: Mark potential stand locations, rubs, scrapes, water sources, bedding areas, or even where you found good sign like tracks or droppings.
- During the Hunt Pins: If you find a fresh rub line, mark it. If you jump a deer, mark its general direction of travel. And most importantly, if you make a shot, mark the last known location of your animal. This can be invaluable for tracking.
- Parking and Trailhead Pins: Never lose your vehicle again! Mark your parking spot or the trailhead to ensure an easy return.
How to do it: Simply long-press on any location on the map to drop a red pin. You can then tap on the pin to save it, add a label (e.g., “Stand Site 1,” “Deer Bedding,” “Parking”), and even add notes. These saved places will then show up in your “Saved” tab in the Google Maps menu.
3. Measuring Distances and Areas
Need to know how far it is from your truck to your stand? Or want to get a rough idea of the size of a food plot? Google Maps has you covered.
- Distance Measurement: This is excellent for planning your walk-in, understanding shot distances, or estimating how far you might need to track an animal.
- Area Estimation: While not as precise as dedicated GIS software, you can get a good approximation of the size of a field, thicket, or potential food plot location.
How to do it (Distance): Long-press on your starting point to drop a pin. Tap the pin, then scroll down and select “Measure distance.” Drag the map to your next point, and the distance will be displayed. You can add multiple points to measure a path.
How to do it (Area): While there isn’t a direct “measure area” tool, you can use the distance measurement tool to outline an area and get a rough approximation of its perimeter, then manually calculate. For example, measure the length and width of a rectangular area.
4. Terrain View: Understanding the Landscape
The terrain view in Google Maps provides contour lines, which are incredibly helpful for understanding elevation changes, ridges, and valleys – key features for predicting animal movement.
- Identify Ridges and Valleys: Animals often travel along the tops of ridges or through the bottoms of valleys to conserve energy.
- Find Saddles and Funnels: Saddles (dips in a ridge) are natural crossing points for animals, and understanding the terrain can help you pinpoint these hidden travel corridors.
- Plan for Wind Direction: Knowing the topography can help you anticipate how wind will swirl and behave, allowing you to choose a stand location that keeps your scent out of the animals’ noses.
How to do it: Tap the “Layers” icon, and then select “Terrain.”
5. Offline Maps: Crucial for Backcountry Hunting
One of the biggest concerns with using phone-based mapping in the wilderness is cell service. Google Maps addresses this with its offline maps feature. Before you head out, download the map of your hunting area, and you’ll have access to it even without a signal.
- Navigate Without Service: Still see your marked locations and your current position on the map, even deep in the backcountry.
- Peace of Mind: No more worrying about getting lost if your signal drops.
How to do it: In the Google Maps app, tap your profile picture in the top right, then select “Offline maps.” Tap “Select your own map” and pan/zoom to cover your hunting area. Download it before you leave home!
6. Street View (Where Available): A Different Perspective
While less useful for deep woods hunting, Street View can occasionally offer insights, especially for public land access points, parking areas, or understanding the transition zones between developed and wild areas. You might even spot a good entry point or a hidden trail from the road.
How to do it: Drag the little yellow “pegman” icon (found near the layers button) onto a blue line on the map to enter Street View.
Putting It All Together: A Hunting Scenario
Let’s walk through a hypothetical deer hunt using only Google Maps.
- Pre-Season Scouting (Couch Phase):
- Open Google Maps to your hunting property.
- Switch to Satellite view.
- Identify a hardwood ridge bordering a thick clear-cut. “This looks like a good travel corridor,” you think.
- Notice a subtle saddle in the ridge. “Perfect for a stand site.”
- Drop a pin on the saddle and label it “Potential Stand Site – Ridge Saddle.”
- Drop another pin at your planned parking spot for easy access. Label it “Parking Area.”
- Switch to Terrain view to confirm the elevation changes and ensure that saddle is indeed a distinct dip.
- Use the Measure distance tool to estimate the walk from your parking spot to your potential stand site.
- Field Scouting:
- Drive to your “Parking Area” pin.
- Before leaving your car, ensure your Offline Map is downloaded for this area.
- Hike in, navigating using your “Parking Area” and “Potential Stand Site” pins.
- As you walk, you find a fresh rub on a tree. Long-press on that location and drop a pin, labeling it “Fresh Rub.”
- Further along, you discover a small creek with fresh tracks. Drop a pin and label it “Creek – Water Source.”
- Arriving at your “Potential Stand Site,” you confirm it’s a great spot. You rename the pin to “Deer Stand – Ridge Saddle.”
- The Hunt:
- The morning of the hunt, you use Google Maps to navigate to your “Deer Stand” pin.
- You settle in. A few hours later, you take a shot at a buck.
- The buck bolts into thick cover. Before you get down, you drop a pin at the exact spot where the buck was standing when you shot, labeling it “Shot Location.”
- You also drop a pin at the last known direction the buck ran, labeling it “Last Seen Direction.”
- After waiting, you use your “Shot Location” and “Last Seen Direction” pins to begin your tracking efforts, knowing exactly where to start and where to focus your search.
Limitations (and How to Work Around Them)
It’s important to acknowledge that Google Maps isn’t a perfect one-to-one replacement for dedicated hunting apps.
- Public/Private Land Boundaries: This is the biggest drawback. Google Maps does not display public and private land ownership boundaries. This is a critical feature for many hunters, especially on public land.
- Workaround: You’ll need to consult official state game and fish department maps, county plat maps, or BLM maps to understand land ownership. Many states offer free online mapping tools for this purpose. Use these in conjunction with Google Maps. Once you’ve identified public land, you can use Google Maps for all your detailed scouting within those boundaries.
- Specific Hunting Layers: You won’t find layers for species-specific ranges, recent fire data, or specific game management units directly in Google Maps.
- Workaround: Again, consult official state resources. Overlay this information mentally or by sketching it on a physical map, then use Google Maps for the detailed terrain analysis.
- No Property Owner Information: Unlike some paid apps, Google Maps won’t give you landowner names for permission requests.
- Workaround: You’ll need to use county assessor websites or plat books to find this information.
- Less Robust GPS Tracking: While Google Maps shows your location, it doesn’t offer the detailed track recording and analysis features of dedicated hunting GPS units or apps.
- Workaround: For critical track recording, consider a basic handheld GPS unit if you hunt in extremely remote areas. For simple navigation, the “blue dot” on Google Maps is usually sufficient.
The Verdict: Is Google Maps Enough?
For many hunters, especially those on a budget or who primarily hunt on private land or easily identifiable public parcels, Google Maps can absolutely be a powerful and effective tool. It provides excellent satellite imagery, terrain understanding, and custom waypoint features that are essential for scouting and navigation.
While it lacks the specific public/private land boundary overlays of premium apps, with a bit of extra homework using free government resources, you can bridge that gap.
So, before you shell out another $30, $50, or even $100 for a hunting app subscription, take some time to explore the capabilities of Google Maps. You might be surprised at how much it can do, and your wallet will definitely thank you for it! Happy hunting!
*AI was used to help create this post.
Discover more from HuntingOfficer
Subscribe to get the latest posts sent to your email.